AWS EC2, Nginx를 사용하여 서비스 배포하기(with React.js, express.js) - 2
Nginx 사용하여 React 앱 배포, https 연결 (by certbot)
Nginx로 React 배포하기
- EC2에서 React App을 빌드한다
- 빌드 전에 반드시 git pull을 받고, .env 등의 설정 파일이 배포환경에 맞는지 확인한다. .env가 없으면 생성한다. (.env는 일반적으로 .gitignore에 올라가므로 git pull 시 받아와지지 않는다.) - Nginx를 설치한다 (’ubuntu nginx 설치’ 검색)
- Nginx 설정하기
# nginx 기본 설정 파일
sudo vi /etc/nginx/nginx.conf
여기서 바로 build(react) 폴더로 이어지게 설정할 수도 있지만, 설정들을 깔끔하게 관리하기 위해서 일반적으로
/etc/nginx/sites-enabled 디렉토리를 생성하여 설정들을 넣고 nginx.conf가 이를 확인하도록 한다
# nginx.conf에 아래 내용 추가
include /etc/nginx/sites-enabled/*.conf;
일반적인 방식은 sites-available 디렉토리에 필요한 파일들을 작성한 후 이와 연결되는 symbolic link를 sites-enabled에 추가함
sudo ln -s /etc/nginx/sites-available/#######.conf /etc/nginx/sites-enabled/#######.conf
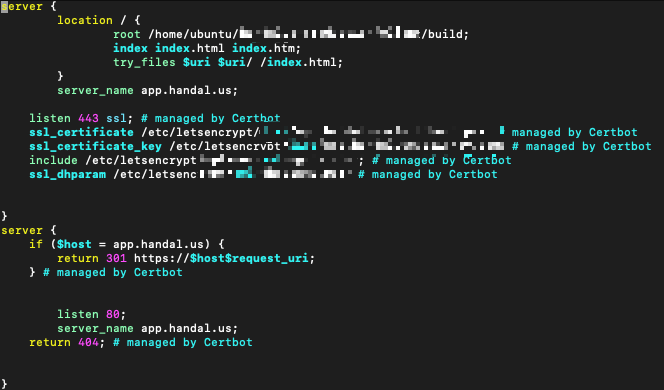
sites-available에는 다음과 같은 설정을 추가하여, build한 react app의 index.html을 배포한다.
server {
	location / {
                root /home/ubuntu/handalus-production/client/build;
                index index.html index.htm;
                try_files $uri $uri/ /index.html;
        }
}
이제 sudo systemctl start nginx를 통해 nginx를 실행한 후 도메인을 주소창에 입력하면 앱이 브라우저에 나타날 것이다.
Certbot으로 ssl 인증서 발급 & 도메인에 연결
Certbot 설정
# certbot 다운로드
sudo snap install --classic certbot

# ssl 인증서 적용
sudo certbot --nginx -d 자신의도메인
도메인에 https 프로토콜을 연결하려면 ssl 인증서가 필요하다.
Let’s Encrypt는 ssl 인증서를 무료로 발급해주는 업체인데, Let’s Encrypt 인증서를 자동으로 발급/갱신해주는 봇이 바로 Certbot이다.
위와 같이 certbot을 설치하고 명령어를 실행해주면 자동으로 nginx 상에 설정 파일이 수정되며 https가 연결된다.
- 주의 : certbot 명령어를 사용하기 전에, 적용하고자 하는 도메인을 sites-available의 .conf 파일의 server_name에 등록해줘야 한다.
node.js 서버 코드 추가
위 설정을 적용하기 위해서는 node.js 코드에서도 설정을 추가해줘야 한다.
다음과 같이 설정하여 개발/배포환경에 따라 https 설정에 필요한 pem키를 다르게 등록하였다.
// 로컬에서 https 적용
const options = {
  key: fs.readFileSync("localhost-key.pem"),
  cert: fs.readFileSync("localhost.pem"),
};
// 배포 환경일때
if (process.env.NODE_ENV === "production") {
  const prodOptions = {
    ca: fs.readFileSync("/pem경로/chain.pem"),
    key: fs
      .readFileSync(
        path.resolve(
          process.cwd(),
          "/pem경로/privkey.pem"
        ),
        "utf8"
      )
      .toString(),
    cert: fs
      .readFileSync(
        path.resolve(
          process.cwd(),
          "/pem경로/cert.pem"
        ),
        "utf8"
      )
      .toString(),
  };

  https.createServer(prodOptions, app).listen(PORT, () => {
    console.log(PORT, "번 포트에서 대기 중(https) <배포서버>");
  });
}

// 로컬 환경일 때
else {
  https.createServer(options, app).listen(PORT, "0.0.0.0", () => {
    console.log(PORT, "번 포트에서 대기 중(https) <로컬서버>");
  });
}
References
[AWS] EC2에 React + Node.js 앱 배포하기! (2) - Nginx를 사용한 React 배포
📚 AWS EC2에 React + Node.js(express+apollo) 배포하기! - Nginx를 사용한 React 앱 배포!
velog.io
https://hudi.blog/https-with-nginx-and-lets-encrypt/
Nginx와 Let's Encrypt로 HTTPS 웹 서비스 배포하기 (feat. Certbot)
목표 우리의 목표 우리의 목표는 위 그림과 같다. 클라이언트와 WAS 사이에 리버스 프록시 서버를 둔다. 클라이언트는 웹서버처럼 리버스 프록시 서버에 요청하고, WAS는 리버스 프록시로부터 사
hudi.blog
[Ubuntu, Nginx] Let's Encrypt로 https 적용하기
Https는 필수인가? 개인적인 용도로 사용하는 서버라면 상관 없지만, 회원가입과 같은 개인정보가 사이트에 들어가는 경우 2012년 8월 18일부터 법이 변경되어 정보통신망 이용촉진 및 정보보호 등
syudal.tistory.com